We're not buying film anymore, and megabyte are cheap! So take Lots of pictures!
Whatever it is you're shooting- kids, flowers, birds, sports, animals, cars, models, or leaves..... take lots and lots of shots. If you take a picture of a grasshopper, shoot it from 14 different angles. Get high, low, closer, farther.. shoot vertical, horizontal, different crops and different apertures. Same goes for portraits- I typically come home from a family portrait session with well over 300 images on my card. I usually narrow these down to the best 25-30.
Please understand- I'm not suggesting the "Spray & Pray" method. This term describes those who choose not to bother themselves with all the hassle of learning, practicing, and improving their photography. Instead they choose to aimlessly fire off frames in massive numbers and hope for a good one. Not a good technique.
We want to do our best to make every shot count. But certainly the more options we have to choose from, the more great keepers we will get. Wedding photographers will typically shoot thousands of frames in a weekend, and only a small percentage of the photos will be included in the wedding album. World renown commercial and advertising photographer Chase Jarvis, says he often shoots many thousands of frames per day when on assignment.... and only One of those photos will ever be seen by the public.
So get yourself a big memory card and some extra batteries, and shoot away!
Tim
Friday, April 6, 2012

Monday, April 2, 2012
Soccer Saturday
For all you soccer Moms & Dads out there-
On Saturday morning my youngest had her first soccer game of the season. I thought I'd share a few pictures along with some soccer shooting tips...
On Saturday morning my youngest had her first soccer game of the season. I thought I'd share a few pictures along with some soccer shooting tips...
Capturing the intimidation factor

Shooting from a low perspective


Shutter speed of at least 1/800th sec. will the freeze action


I really like to shoot through the net for a unique perspective

Zooming in tight

f4 Aperture setting for a shallow depth of field.


Capturing the moments after the score!


Breakdown-
- As always, avoid mid-afternoon sun when possible. Check your soccer schedule and choose a morning or evening game to shoot.
- Move around the field. The corners of the field offer good shooting angles. Try some shots from behind the goal, shooting through the net.
- Avoid busy backgrounds. If possible, shoot in a direction that doesn't fill your background with people, cars, lawn chairs, trashcans, etc...
- Get low. Your knees may get green and wet, but shooting from a low perspective will improve the look of your images.
- Use a long lens- Zoom in tight, and then crop in even tighter in post.
- Shoot in Aperture Priority mode and set your Aperture to the lowest number available for your lens (assuming it is between f2.8 - f5.6). This will keep your depth of field shallow.
- Watch your shutter speed. In Aperture Priority mode your camera will automatically adjust your shutter speed- Be aware of what it's doing. You'll need at least 1/800th of a second to freeze the action. If your shutter speed is too slow, increase your ISO.
- Set White Balance to "Cloudy" for warm skin tones.
- Set up your camera's focus to use only the center focus point, and keep that point on your subject.
- Select Continuous Autofocus, this is "AI Servo" on Canons. Hold the shutter button half way down as you track your subject. The autofocus will adjust continuously as your subject moves.
- Set your drive mode to Burst or High Speed Continuous, and take a LOT of shots.
- Don't put the camera down after a goal is scored, be ready to capture the reactions.
Tim
photojabber blog by tim wyler
easy tips and techniques for beginner photographers
shooting soccer games sports
Wednesday, March 28, 2012
Focus Your Focus
A quick Beginner's Tip for shooting with shallow depth of field.......
Shooting portraits with a fast (wide-aperture) lens creates those soft, dreamy backgrounds that everybody loves. But this very shallow depth of field can make it challenging to keep our subject in sharp focus.
Focus your focus point on the nearest eye.


The above photo was shot with my Fast Fifty lens from about 4 feet away, at an aperture setting of f2.5. This, according to my trusty iPhone depth of field calculator app, gives me a total depth of field of about 2 &1/4 inches. That's only 2 1/4 inches of sharp focus! Anything in front of that thin plane of focus, and anything behind it, will begin to look soft. This is why it is so important to put your focus point right where you want it.
It's all about the eyes! Generally it's not overly important to see ears and mouths and noses in sharp focus. But the eyes must be sharp... or I should say, the nearest eye must be sharp. Therefore, that is where we want to put our focus point.
You wouldn't dare blur these eyes..

To do this- Set your camera to utilize only one focus point, the one in the center. (it's easy to do...you have read your manual right?) Now when you prepare to take your shot, just put the center focus point right over the nearest eyeball and depress the shutter button half-way. When you hear the "beep", the focus is locked on. Now, if you don't want that eye directly in the middle of the photo, keep holding the button half-way while you recompose the shot, and then click. Be careful when recomposing that you don't lean forward or back. Just a little movement can throw off your focus- remember we only have 2 1/4 inches in this example.
If you are shooting very close up, or using a lens with a crazy fast aperture like f1.2, you may have a total depth of field of less than one inch! In this case you should not even dare to recompose the shot, just focus and click- you can adjust the composition in post processing.
Keep in mind, if your subject is moving, wiggling, jumping, twirling, or bouncing, you're not going to have much luck nailing your focus. Crank the aperture down to f8 and your depth of field will become much much deeper, making everything look sharp.
Hope you like,
Tim
photo jabber blog by tim wyler
simple tips and techniques for beginner photographers
depth of field for portraits
Saturday, March 24, 2012
Blue on White

I rarely shoot indoor portraits, but it can be a lot of fun. This photo session of our friends' boy was shot in my living room. I used two off-camera speedlights, a reflector, and a white background. The first speedlight is positioned camera-left with a shoot-through umbrella. The umbrella is very close to our subject so the light is very soft. The large white reflector to his left helps fill in the shadows. A second speedlight, up high behind the boy, is used to light the white background. (if the white background were not lit, it would appear gray) It's a simple, inexpensive setup. And it's lots of fun.
Hope you like,
Tim
Thursday, March 22, 2012
Softball Season

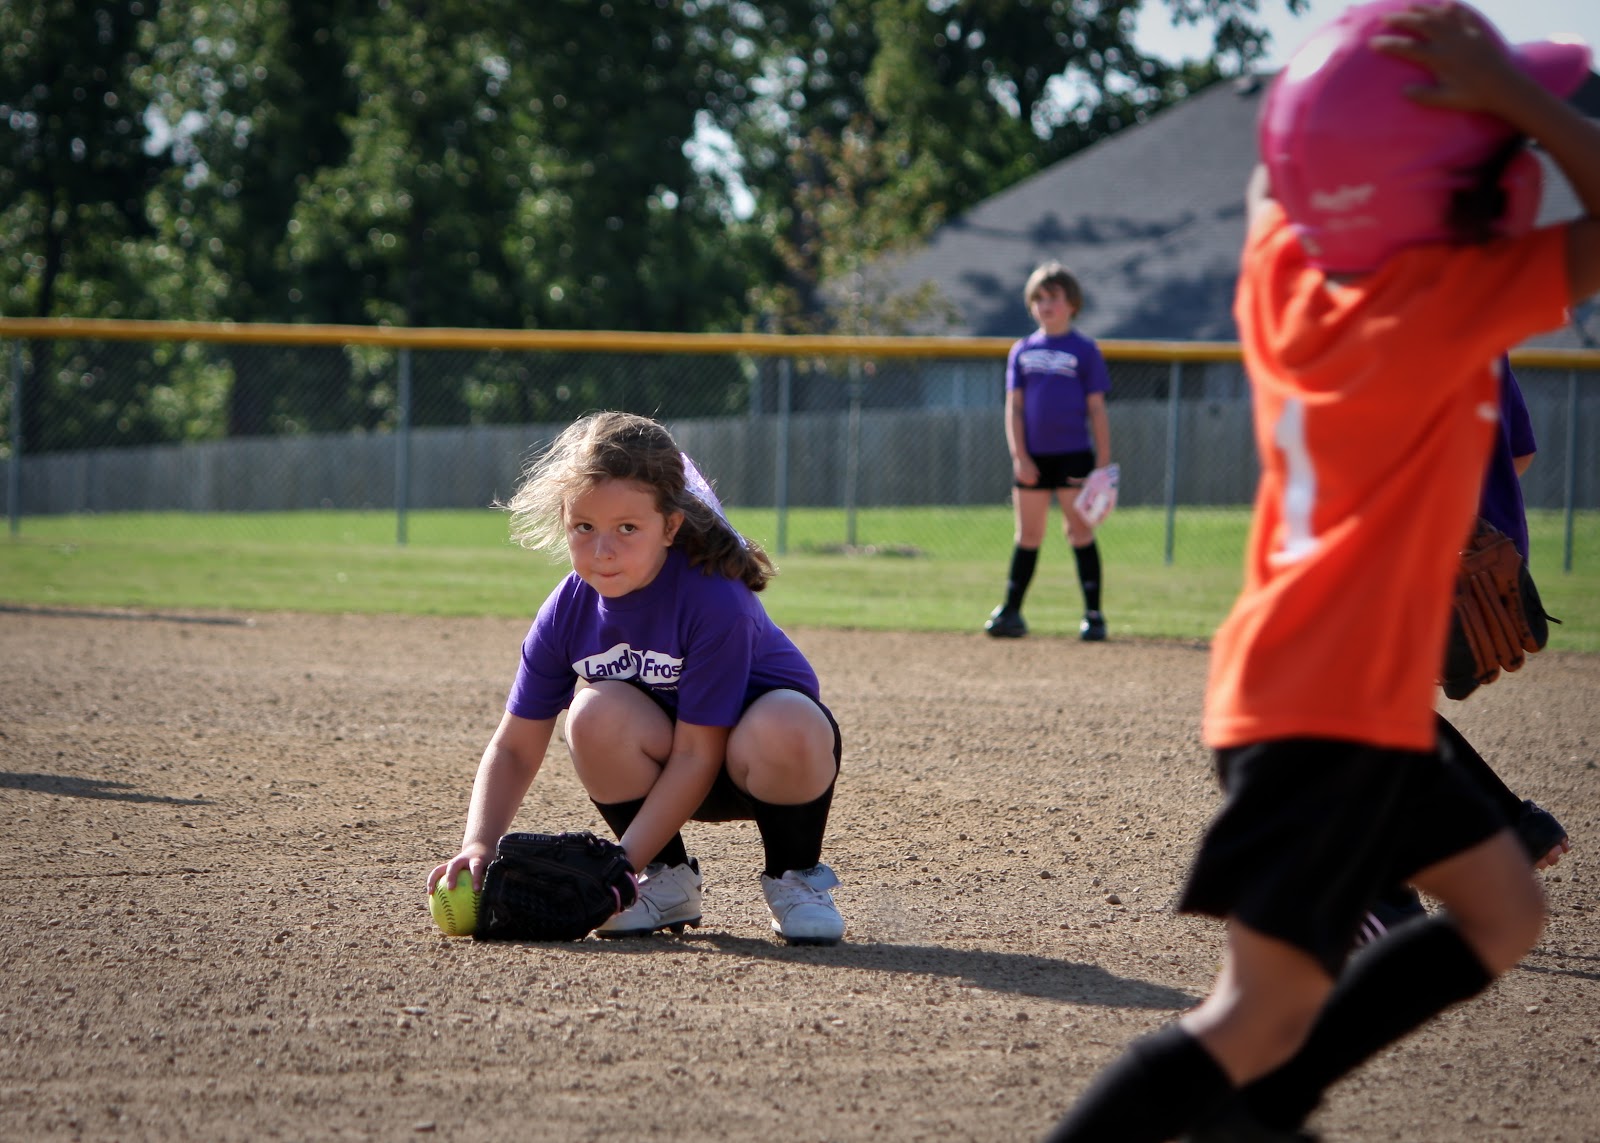
Softball offers a variety of shooting situations..
Some action.............. Some not.............


I like shooting softball for many reasons.. First, it's outdoors and usually in the evening, which means great light! And second, I usually don't have to run around too much... most of the action can be captured from one spot. But the action shots are just a part of the photographic opportunities at the game. I really like to try to capture a lot of the off field moments too... in the dugout, warm-ups, cheering, chanting, etc..
If you have a softball player in your family, here are a few shooting tips- Try to take advantage of the Magic Hour, avoid shooting the mid-afternoon games if possible. As with any sport, use a fast shutter speed to freeze the action. Select Aperture Priority mode and the smallest aperture number available. This wide aperture will keep your shutter speed fast, and your depth of field shallow. (sport shots are always better with blurred backgrounds) Shoot from a low perspective, this is important. Set your camera's shooting mode to Burst for the action shots, and fire off several. Remember to zoom in tight as possible, this will isolate your subject and further help to blur out the background. Set White Balance to Cloudy to give your images a slightly warm tone.
Most importantly, don't forget to capture some of those non-action shots. Take close ups of bats, bases, catcher's mask, etc.... Also get lots of shots of the players having fun in the dugout, cheering and yelling their crazy chants!
Use Burst mode for action shots to capture a sequence.


The off the field shots..


The serious moments......


The not so serious moments..


Capture the players' personalities...

The good times...

The bad...

Team spirit..


and don't forget to enjoy the game!
Tim
photo jabber blog by tim wyler
softball sports photography tips and techniques
Wednesday, March 21, 2012
Getting Close
Don't get in a habit of always shooting portraits from the same distance.
Get closer and zoom in tight for a different perspective.

If your background is distracting, fill the frame with something pretty!


Experiment with different crops and angles in post processing.


Hope you like,
Tim
photo jabber blog by tim wyler
learn to take better family portraits
simple tips for beginning photographers
Monday, March 19, 2012
Siblings
I've known these two since they were little, so this photo kinda makes me feel old.

f5.0, 1/125 sec. 150mm
Pin It
This was shot on an overcast day, which is actually not a bad time to shoot. The overcast sky acts like a giant diffuser, making the ambient light nice and soft and even. I used an off-camera flash, positioned camera-right, to punch up the highlights a little and add some catchlight to the eyes. I stood waay back in order to get lots of the tall grass between me and my subjects, then I zoomed in to 150mm. You can see how the compression from the long focal length, combined with the shallow depth of field from the f5 aperture, helps throw the foreground and background nicely out of focus.
I really like this photo because it incorporates all of my favorite portrait shooting elements- Soft light, off-camera flash, long focal length, and nice foreground. Oh yeah, and photogenic subjects!
Hope you like,
Tim
photo jabber blog by tim wyler
portrait photography tips for beginners
better family portraits
Subscribe to:
Posts (Atom)