Wednesday, March 28, 2012

Focus Your Focus

A quick Beginner's Tip for shooting with shallow depth of field.......

     Shooting portraits with a fast (wide-aperture) lens creates those soft, dreamy backgrounds that everybody loves.  But this very shallow depth of field can make it challenging to keep our subject in sharp focus.


Focus your focus point on the nearest eye.


      The above photo was shot with my Fast Fifty lens from about 4 feet away, at an aperture setting of f2.5.  This, according to my trusty iPhone depth of field calculator app, gives me a total depth of field of about 2 &1/4 inches.  That's only 2 1/4 inches of sharp focus!  Anything in front of that thin plane of focus, and anything behind it, will begin to look soft.  This is why it is so important to put your focus point right where you want it.
     It's all about the eyes!  Generally it's not overly important to see ears and mouths and noses in sharp focus.  But the eyes must be sharp... or I should say, the nearest eye must be sharp.  Therefore, that is where we want to put our focus point.

You wouldn't dare blur these eyes..


     To do this- Set your camera to utilize only one focus point, the one in the center.  (it's easy to do...you have read your manual right?)  Now when you prepare to take your shot, just put the center focus point right over the nearest eyeball and depress the shutter button half-way.  When you hear the "beep", the focus is locked on.  Now, if you don't want that eye directly in the middle of the photo, keep holding the button half-way while you recompose the shot, and then click.  Be careful when recomposing that you don't lean forward or back.  Just a little movement can throw off your focus- remember we only have 2 1/4 inches in this example.
     If you are shooting very close up, or using a lens with a crazy fast aperture like f1.2, you may have a total depth of field of less than one inch!  In this case you should not even dare to recompose the shot, just focus and click- you can adjust the composition in post processing.
     Keep in mind, if your subject is moving, wiggling, jumping, twirling, or bouncing, you're not going to have much luck nailing your focus.  Crank the aperture down to f8 and your depth of field will become much much deeper, making everything look sharp.

Hope you like,
Tim


photo jabber blog by tim wyler
simple tips and techniques for beginner photographers
depth of field for portraits

Saturday, March 24, 2012

Blue on White


     I rarely shoot indoor portraits, but it can be a lot of fun.  This photo session of our friends' boy was shot in my living room.  I used two off-camera speedlights, a reflector, and a white background.  The first speedlight is positioned camera-left with a shoot-through umbrella.  The umbrella is very close to our subject so the light is very soft.  The large white reflector to his left helps fill in the shadows.  A second speedlight, up high behind the boy, is used to light the white background.  (if the white background were not lit, it would appear gray)  It's a simple, inexpensive setup.  And it's lots of fun.

                 RF-603 Radio Triggers

Hope you like,
Tim

Thursday, March 22, 2012

Softball Season


 Around here we go from one sport right into the next.  My three young girls are into nearly every activity there is, so I have plenty of opportunities for shooting sports.  Softball is one of my favorite photographic sporting events, and the season is fast approaching.  


Softball offers a variety of shooting situations..

Some action..............                                   Some not.............

     I like shooting softball for many reasons..  First, it's outdoors and usually in the evening, which means great light!  And second, I usually don't have to run around too much... most of the action can be captured from one spot.  But the action shots are just a part of the photographic opportunities at the game.  I really like to try to capture a lot of the off field moments too...  in the dugout, warm-ups, cheering, chanting, etc..  

     If you have a softball player in your family, here are a few shooting tips-  Try to take advantage of the Magic Hour, avoid shooting the mid-afternoon games if possible.  As with any sport, use a fast shutter speed to freeze the action.  Select Aperture Priority mode and the smallest aperture number available.  This wide aperture will keep your shutter speed fast, and your depth of field shallow. (sport shots are always better with blurred backgrounds)  Shoot from a low perspective, this is important.  Set your camera's shooting mode to Burst for the action shots, and fire off several.  Remember to zoom in tight as possible, this will isolate your subject and further help to blur out the background.  Set White Balance to Cloudy to give your images a slightly warm tone.  
     Most importantly, don't forget to capture some of those non-action shots.  Take close ups of bats, bases, catcher's mask, etc....  Also get lots of shots of the players having fun in the dugout, cheering and yelling their crazy chants!


 Use Burst mode for action shots to capture a sequence.  


The off the field shots..


The serious moments......


The not so serious moments..


Capture the players' personalities...


The good times...


The bad...


Team spirit..


and don't forget to enjoy the game!


Tim


photo jabber blog by tim wyler
softball sports photography tips and techniques

Wednesday, March 21, 2012

Getting Close

Don't get in a habit of always shooting portraits from the same distance.
Get closer and zoom in tight for a different perspective.


If your background is distracting, fill the frame with something pretty!


Experiment with different crops and angles in post processing.


Hope you like,

Tim

photo jabber blog by tim wyler
learn to take better family portraits
simple tips for beginning photographers

Monday, March 19, 2012

Siblings

I've known these two since they were little, so this photo kinda makes me feel old.  

f5.0, 1/125 sec. 150mm

Pin It

     This was shot on an overcast day, which is actually not a bad time to shoot.  The overcast sky acts like a giant diffuser, making the ambient light nice and soft and even.  I used an off-camera flash, positioned camera-right, to punch up the highlights a little and add some catchlight to the eyes.  I stood waay back in order to get lots of the tall grass between me and my subjects, then I zoomed in to 150mm.  You can see how the compression from the long focal length, combined with the shallow depth of field from the f5 aperture, helps throw the foreground and background nicely out of focus.
     I really like this photo because it incorporates all of my favorite portrait shooting elements- Soft light, off-camera flash, long focal length, and nice foreground.  Oh yeah, and photogenic subjects!


Hope you like,
Tim

 photo jabber blog by tim wyler
portrait photography tips for beginners
better family portraits
 

Friday, March 16, 2012

Unleash your Photographic Betterness


     Imagine if there was one piece of equipment that you could buy for around 100 bucks which would make your photography better!  Well, there's really not, but there sorta kinda is.....  Here's the thing- New camera gear will definitely NOT make you a better photographer!... However!!  Sometimes the right gear can help you take your learning up a notch, and let you rise to your maximum potential, thereby unleashing your photographic betterness!  And if you learn to use that new gear properly, it may allow you to make images that do actually look better.  
     One such piece of equipment is the 50mm f1.8 prime lens.  Both Canon and Nikon produce versions of this lens which sell for just a little over $100.  By far, this is the best $100 a novice photographer can spend on any piece of equipment IMHO.  Known as the "fast 50" or the "plastic fantastic", the 50mm f1.8 is incredibly small and light, and produces amazing image quality with super sharpness that you will never get from a zoom lens.  
Canon 50mm, shot at f1.8

     Small, light, and cheap are all great features, but the 50's greatest asset is it's wide f1.8 maximum aperture.  If you are wondering how those other photographers get that nice soft dreamy background blur in their portraits, here ya go!  Now, I got really deep into aperture and f-numbers and depth of field in my last post - Here, so I won't really go back into all that again.  But you should just know this- if you like shooting portraits, you will love this lens.
     
     Canon 50mm, shot at f2.5

Hope you like,
Tim

    photo jabber blog by tim wyler
simple tips and techniques for beginner dslr photographers
#lenses, #aperture, #depth of field, #portraits


Wednesday, March 14, 2012

Exposure Triangle pt. 2 - Aperture

This post contains some pretty deep ramblings for DSLR shooters:
What is Aperture?  What does it do?  Why should you care?
 Fast glass, and shallow depth of field.

   
     If you missed part 1, you can go back and read Exposure Triangle pt. 1 - ISO.

     In that post, I rambled on somewhat about how each of the three points on the triangle will affect the other two, and all three combined will determine the final exposure.  Each of these settings is adjustable, and each adjustment comes with it's own "secondary results", sometimes positive, and sometimes negative.  As we mentioned in part 1, ISO can be increased to improve exposure (brighten the scene).  But the secondary result of increasing ISO is greater noise, or "grain" in the photo.  In this post we'll look at Aperture, and we will see how adjusting our aperture affects our exposure, while also causing some secondary results.
     So what in tarnation is it anyway??  Aperture is actually not a camera setting at all... I mean, you can control it from the camera, but the aperture is inside the lens.  It's the opening inside the lens that lets the light pass through, and it's adjustable from little to big.  Obviously a small aperture lets in only a little bit of light, while a big aperture lets a bunch of light pass through.  And so it's easy to see how our Exposure  is very directly affected by our aperture setting.  
     Okay, well, so that's pretty straight-forward.  But here is the goofy part- the way in which the aperture setting is measured can be a little tough to grasp at first.  See.. Aperture settings are read in f-stops.  An f-stop is a measurement of light.  So, the aperture setting (the f-number) indicates how much light is required to make a proper exposure, using the given aperture size.  Therefore, (are you following this?) a bunch of light, which would measure something like f22, only needs a very small aperture.  A dim, poorly lit scene, measuring say.. f2, would require a much larger aperture in order to properly expose the sensor.  
     If you're still reading this.. it's really starting to sound like a bunch of gobbledygook, but I'm coming to a point, I think.  Here it is...  This explains why the settings on your camera's aperture adjustment are read in f-numbers, and it also sort of explains why those f-numbers seem to be backwards.  What I mean is, f2 is a very large aperture, and f32 is a very small aperture.  Get it?  f2= large opening=not much light required.  f32= small opening= lots of light required.  
     Now let's just assume that you've chosen to completely skip over the previous two paragraphs....  Here is what you really need to know about your camera's Aperture setting.  When you are shooting in a dimly lit environment, like a gymnasium, you will want to set your aperture to a low f-number.  Typical lenses have a maximum aperture value of around f4.  Some lenses get all the way down to f1.2, this is a very large aperture.  If you are shooting outside on a sunny day, you may use a much smaller aperture, like f16 or f22.  
     If you are shooting in Auto mode or Program mode, your camera will automatically select an appropriate aperture setting, as well as shutter speed, for you.  But sometimes the camera may not give you what you really want.  A while ago I said that your aperture setting yields some secondary results.  Besides affecting exposure, your aperture setting directly controls the depth of field in your photos.  Shoot with a high f-number, (small aperture opening) like f22, and your photo will have very deep depth of field, meaning everything in the scene will appear in sharp focus.  Select an aperture setting of f2.8 or f4, and your photo will have a very shallow depth of field, meaning only a thin slice of the image will be in focus while the background appears soft and blurry.  This soft, dreamy background look is the popular style for portraits.  


 f2.8

     So how to get that look...  Set your camera mode to Aperture Priority (AV on Canons), and use the finger dial to roll the aperture setting down to the lowest available number. Aperture Priority mode lets you set the aperture, and your camera automatically adjusts the shutter speed to compensate.  You can amplify the effect by stepping back a little and zooming in tight on your subject.  
     Want even more soft, blurry, dreaminess to your backgrounds? - Get some faster glass.  A "fast" lens is one with a very wide aperture, like f1.8 or f1.2.  It's called "fast" because the wide aperture allows for faster shutter speeds.  A really fast lens can get you that super shallow depth of field look, where your subject's eyes are in sharp focus while the ears are very soft.  It can get a little crazy.

f2.0


     If landscape photos are more your thing, set your aperture to around f16 or f22, and focus about 1/3 of the distance into the scene.  This will ensure that everything in the photo will be nice and sharp.  But be careful... very small apertures like f22 can drive your shutter speed down too slow, causing motion blur.  If this is the case, increase your ISO............  see the triangle at work.


Tim


     #digital photography #aperture priority
#depth of field
photo jabber tips and techniques for novice photographers

Sunday, March 11, 2012

Timeless


Pin It

I like photos that can speak for themselves.


Hope you like,
Tim

Friday, March 9, 2012

Some Randomalities

Canon G1X -     Gordon Lang over at Camera Labs.com recently published his test results after comparing high iso noise performance of the new Canon G1X to popular Canon DSLR's.  Interesting results...  In a nutshell, the G1X wins.  You can read the complete article HERE.
     If you are not yet familiar with the G1X, you may want to check it out.  It has a very high coolness factor IMHO.  The G1X is Canon's latest G-series release- succeeding the G12, which succeeded the G11, which succeeded the G10, which..... well, you get it.  Obviously a little different spin on the name this time, probably because this is not just another updated G-series.  What puts the "X" in the G1X is it's way bigger image sensor.   The APS-C size sensor is actually the same size as the  sensor used in several of Canon's leading DSLR's- the T3i, 60D, and the 7D.  Generally speaking, Bigger sensor = Better image quality, meaning this small, lightweight, convenient, and somewhat pocketable point & shoot type camera is capable of producing image quality that is comparable to bigger, heavier DSLR's.  It's a little on the pricey side at $799, but I predict the G1X will be a big hit with entry-level photographers, as well as advanced shooters who are looking for a vacation/party/walk-around camera.  Visit the official Canon USA site to learn more about the G1X.

Lightroom 4-     After a brief run in Beta, Lightroom 4 is now publicly released.  And the folks at Adobe have made it made it awfully appealing by lowering, actually by slashing the price tag in half!  Now retailing for $149 ($79 for upgrades), Lightroom becomes more accessible to many more folks.
     Here is a good video by Julieanne Kost with Adobe, which explains many of the changes made to Lightroom 4....


     You can order  Lightroom 4 from Amazon.  *Now I will follow up on all of that by saying this:  If you are an Entry-Level photographer / editor - Don't jump into Lightroom just yet.  Google's Picasa is even cheaper- because it's FREE, and it's really very good.

The Digital Photography Book part 4 by Scott Kelby is now released and shipping.  Also available from Amazon, (for that matter, anything on the planet that is for sale is now available from Amazon.)
If you're not into reading books made of paper, it is also available in ibooks and in Kindle versions.

Rounding Out the Randomness- Here is an image from a trip to the West coast a couple of years ago.  I don't do a lot of landscape shooting (when i do it's usually with an iPhone).  Post-proccessing was done in Photoshop Elements 8.


Pin It

Hope you like,
Tim

photo jabber blog by tim wyler
simple tips and techniques for novice photographers


Tuesday, March 6, 2012

Zooming In

In a previous post - Shooting Long, I talked about shooting portraits with a long tele-zoom lens.  I was shooting on that day with my DSLR, but the same principle applies to compact point & shoot cameras.


     This is another pair of shots from my wife's Panasonic ZS3 point & shoot camera.  Like most compact cameras, this Panasonic has a zoom lens- a pretty long one at 12X.  This means the focal length (when adjusted for sensor size) is equal to 25mm on the wide end, and out to 300mm when fully extended.
   
     For the photos above, I positioned my pretty volunteer with her back to the sun.  I stood very close to her, only about three or four feet away, and took the first shot.  For this shot my lens was zoomed all the way out to it's widest setting of 25mm.  For the second shot I simply backed up and zoomed in.  With the lens zoomed all the way in to 300mm I needed to step back a good 20 feet or so.

     So look at what a difference a zoom lens can make.  First, looking at our subject, the distortion caused by the wide angle lens in the first photo is obvious.  Her head and facial features have a little bit of that fun-house mirror effect.  Now look the difference in the two backgrounds.  In the first photo the background is cluttered and distracting.  All of the background elements are in sharp focus which gives the image a very two dimensional look.  The background of the second photo has a much different look.  It's soft, slightly out of focus, and the overall scene is greatly compressed which makes the background less distracting.  See the difference in the picket fence?  That's the compression effect from the long focal length.

     You don't necessary need to zoom to 300mm.  Portrait photographers generally favor a lens focal length of at least 70mm, this is long enough to eliminate wide-angle distortion.  So give this a try next time you're shooting a portrait-  back up and zoom in.

Tim


Saturday, March 3, 2012

Force the Flash


     Today I grabbed my wife's Panasonic Lumix point & shoot camera, along with one of my favorite models, for a couple of quick shots to demonstrate the effects of using fill-flash for outdoor portraits.  Yet another beautiful, unseasonably warm day here today.  
     
     Bright afternoon sunlight overhead- so certainly no shortage of ambient light to work with.  But I don't want harsh afternoon sunlight directly on my subject's face, so I placed her back toward the sun.  Now she has great accent lighting on her hair and shoulders, but her face remains shaded.  I left the camera in Auto mode and took a shot.  As you can see in the first image above, it turned out okay.  

     But it's so super easy to make this okay-looking photo look better.  (I'm just talking about the exposure here, the subject is beautiful in either photo).  So I sorta remember saying something in a previous post- (This One) about the evils of using in-camera flash for portraits.  I think I said "Never Never", but what that really means is  "Never except for maybe Sometimes".  Actually I can and do stand by my previous declaration, as it was referring specifically to Indoor portraits.  Using in-camera flash for Outdoor portraits is not only acceptable, it's a really great idea.

     When shooting outdoors, the job of your camera's flash is to provide fill-light.  It's just a subtle little kiss of extra light  to fill in the shadows on the face, give a little catchlight in the eyes, and help separate your subject from the background.  

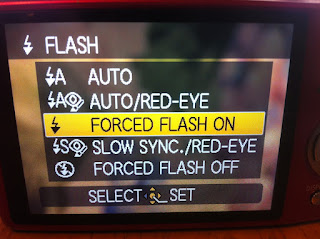
     For my second shot above, I set the camera to "Forced Flash On," and I took the same shot.  The effect is subtle, (as it should be) but I think it really improves the look of the photo.  Most point & shoot cameras have a button with the little flash/lightning bolt symbol to access the flash menu.  Simply set your flash to "ON" or "Forced ON" or whatever the term is used by your particular camera, and shoot away.  Be aware these tiny built-in flashes are pretty weak, so don't try this from across the yard.  


Hope you like,
Tim

Thursday, March 1, 2012

Camera Awesome for iPhone

     The folks at SmugMug have just released a very cool new iPhone camera app which they have modestly named "Camera Awesome".  In the limited time I have played around with the app so far, I do agree there is definitely some degree of Awesomeness to it.  
     
     Camera Awesome contains many of the standard features found in most iPhone camera apps, but with a few noteworthy extras.  The feature that first stood out to me was the cameras speed.  "Blistering Speed" is SmugMug's claim.  I'm not too sure about blistering, but I am pretty impressed.  The app opens very quickly, shutter lag is minimal, and a Burst mode allows for continuous shooting at a "not really all that fast but pretty good for a phone" frame rate.

    For editing your photos, the "Awesomize" button is the app's all-in-one enhancement tool.  One touch of Awesomize seems to boost colors, increase sharpness, clarity, contrast, brightness, and who knows what all else.  It's a pretty nice effect, although it does take several seconds to process all that awesomeness.  

   
     A plethora of filters, presets, and various special effects are available to dress up your photos with a variety of looks and styles, if that's your thing.


     The camera app has a shot timer, an intervalometer (kinda cool), focus point and exposure point selection capability (very cool), and even an image stabilization feature (not sure if this really works).  You can also shoot video through the app.  There's the normal video mode, and a somewhat gimmicky "pre-cord" mode which captures video beginning 5 seconds Before you push the record button.

     Finally, SmugMug has made it simple to share your masterpiece with the world with the 1-tap share page, which includes social media, photobucket, email, and of course SmugMug.


     I think this shall be my iPhone camera app of choice for a while - at least until something better comes along.  Oh yeah, BTW the app is FREE!  Read more about it Here- Camera Awesome


Tim


photo jabber blog by tim wyler
simple digital photography tips and techniques
for novice photographers